
Patient Lifts allow a person to be lifted and transferred with a minimum of physical effort. Before attempting to lift anyone practice with the lifter by using a helper, not the patient. You must know and understand how the lifter will feel with a patient in it. Be certain to explain the lifting sequence to the patient before attempting to lift them the first time.
The Boom of the lift does not swivel. The patient's weight must be centered over the base legs at all times. Do not attempt to lift patient with the mast/boom assembly swiveled to either side. Always keep patient facing the attendant operating the lifter.
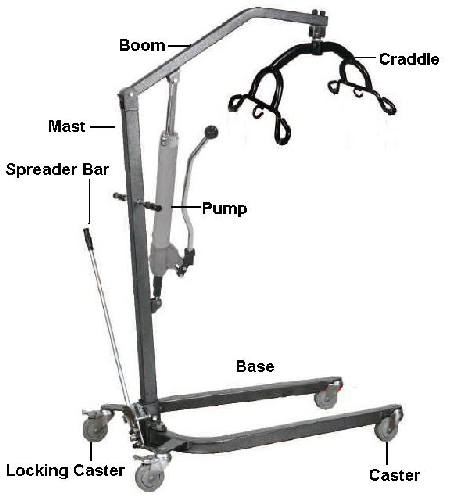
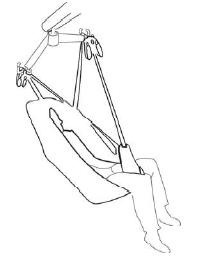
Typical Patient Lift diagram:
Manual and Powered Patient Lifts operate similarly. The manual versions have hydraulic cylinders and a hand-
To raise the patient the base of the Patient Lifter must be spread to its widest possible position to maximize stability.
To lower patient open the hydraulic pressure release knob by turning it counter-
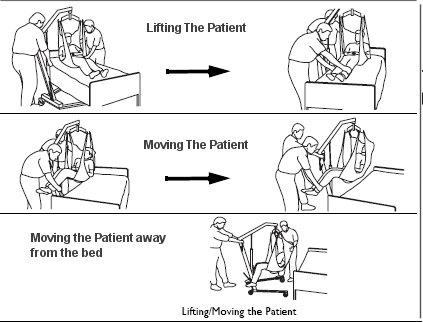
Transfer from Bed
If patient needs support and is in a hospital bed, raise side rails and have patient hold onto rails. Raise the level of the bed to the highest position before moving the patient onto the sling. This will reduce strain on the caregiver's back. Also, when the patient is ready to be lifted, lower the side rail and the level of the bed, decreasing the distance the patient has to be elevated.
Positioning the Lift for Use:
1. With the legs of the base open and locked, use the steering handle to push the patient lift into position.
2. Lower the patient lift for easy attachment of the sling.

When the patient is clear of the bed surface, swing their feet off the bed.
Using the steering handle, move the lift away from the bed.
When moving the patient lift away from the bed, turn the patient so that he/she faces assistant operating the patient lift.
Press the DOWN button (electric) or open the control valve (manual/hydraulic) lowering patient so that his feet rest on the base of the lift, straddling the mast. Close the control valve.
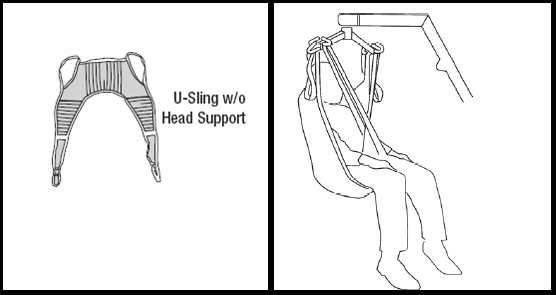
The U-
Below is a diagram of a typical image (see diagram 1) of a typical padded U-
The Sling
Applying the Sling:
Roll patient so the are resting on their side. Put the folded sling behind patients back and roll patient onto their back.
Pull the leg loops forward and under the thigh.
Cross the loops
Roll the base as far under the bed as possible locating the cradle over the patient. Be careful not lower the frame onto the patient.
The caster locks should not be on when lifting the patient, let the lift move a little with the weight adjustment.
When both sides of the sling are attached to their respective sides of the cradle, raise the patient slowly. If patient is in a hospital bed it will help to raise the head section slightly.
Raise the patient until buttocks are just above the mattress. The self-
Grasp steering handles and move lifter away from the bed. Move patient into position over the seat of wheelchair. Make sure wheelchair brakes are on.
Lower patient into wheelchair or other transport device.
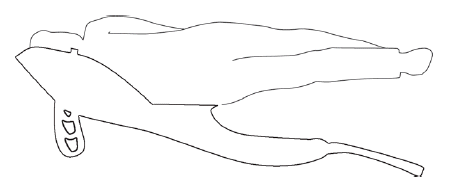
How to Fit Sling From Lying Position
Draw sheet roll the patient onto the sling, ensuring that the top of the commode aperture is at the base of the spine.
Bring the leg support straps up and between the client's legs and proceed as from the seated position, attaching to the shortest possible loops. If you are going to place the patient on a high bed it may be necessary to lower the patient onto an intermediate surface and adjust the strap length.
How to use a Patient Lift Sling
Degree of difficulty to use:
You can measure the degree of difficulty of using a Patient Lift Sling by the type of sling and the position of the patient. It is not really a degree of difficulty, more of a process that can require caregiver patience.
Some slings are easier to use:
There are several styles or types of Slings for Patient Lifts. U-
1. Easy -
1. Side the back support behind the patient
2. Loop the leg straps around patient's leg
3. Attach straps to lift cradle.
4. Raise the patient
2. Process -
1. Lay the patient to one side
2. Fold the sling in half (lengthwise)
3. Slide the folded sling under half the body
4. Roll the patient back the other direction
5. Grab the folded part and drag it to the other side
6. Roll the patient back to a supine position on their back
7. Attach the sling to the cradle
8. Slowly raise the patient
DETAILED DIRECTIONS FOR USING COMMON PATIENT LIFT SLINGS
1. Arrange all items for a smooth transfer -
2. Patient should be in center of twin size bed or to one side of double size bed.
3. Roll patient on side away from attendant. (Raise side rail, if equipped, on side opposite attendant).
4. For full hammock style slings place sling folded half-
5. Place wider piece (seat) under patient's thighs so lower edge of seat is up to knees. Place narrower piece (back) just above small of back. If patient is in hospital bed, position seat sling, then elevate head of bed to facilitate placing back piece.
6. Place sling folded half-
7. Roll patient towards attendant. Pull sling through (like positioning draw sheet).
8. If patient is in chair, you may place sling under patient without lifting patient by following these few simple steps:
a. Have leg flaps open.
b. Have patient lean forward slightly and slide open portion of sling down to seat and lay leg flaps alongside patient's legs.
c. Grasp leg flap on one side of patient and, while holding against knee, pull leg flap forward; repeat with other side until sling is in correct position.
d. Bring flap under one thigh and insert ring (A) into snap (A). Repeat for other leg, inserting ring (B) into snap (B), thus enclosing a thigh in each leg flap.
e. If you wish to use the sling without containing the thighs, follow instructions above but bring ring (A) to snap (B) and ring (B) to snap (A), crisscrossing flaps under the leg.
9. It will help to raise the head of bed after sling is positioned if patient is in a hospital bed.
FOR SLINGS/LIFTS WITH CHAINS:
1. Attach the S-
2. Attach the ends of the chains to the swivel bar hooks. You may hook any link of chain into the swivel bar hook to adjust the height of sling from floor. Make sure links are equal on each side.
3. Attach the S-
4. Patient's arms should be outside chains if possible. He may hold onto chains if desired.
5. Check chains and S-
FOR OTHER SLINGS WITH WEB STRAPS:
1. The S-
2. Hook the center strap into the top hole of the seat and the last strap into the last hole of the seat. Make sure S-
3. Move the lifter so open end of U-
4. Hook the D-
5. Check to see that lower edge of seat is still close to knees and S-
6. Pump hydraulic jack handle. Partially lift the patient; check S-
7. Raise patient until buttocks are just clear of the bed. Swing patient's feet off bed and turn patient to face mast. Grasp steering handles and move patient away from bed. Lower patient as soon as he is clear of bed to keep center of gravity low. Position patient over chair or commode. You may have to raise him from the lower position. U-
brought and positioned under patient. Lock wheelchair locks prior to lowering patient into chair.
If jack has a pin release, press handle SLOWLY towards pump body. Lower patient slowly. Guide his descent. Push gently on his knees as he is being lowered so correct sitting position will result. After reaching seat, press handle against pin and press down on boom.
If the jack has a turn knob release, lower patient by turning the release knob gently to the left. Guide his descent. Push gently on his knees as he is being lowered so correct sitting position will result. After reaching seat, open release knob a turn and press down on boom.
Detach web straps/chains from swivel bar and move lifter away. Then remove web straps/chains from sling. Patient may remain on sling or sling may be removed in reverse of above.
TO RETURN PATIENT TO BED:
1. Same procedure in reverse. Check to see that S-
2. Center patient over bed and lower gently.
USING SLING FOR COMMODE USE
1. Keep web straps or chains taut to hold patient in a comfortable sitting position.
2. Adjust clothing before moving lifter to straddle commode.
USE CARE, DISCRETION AND COMMON SENSE TO DETERMINE IF A SEVERELY SPASTIC OR HANDICAPPED PERSON CAN BE LIFTED WITH A PATIENT LIFTER.
PLEASE NOTE: Web straps,13232, are the only set to be used with the 13227D, 13227P, 13231D, 13231P, 13228D, 13233D, 13235D, 13236P, 13238D, 13237P, 13252PS and13253P slings. 13019 and 13019-
WASHING INSTRUCTIONS
Machine wash warm or cold. Air dry or very low dryer heat. DO NOT USE BLEACH. Do not wash with other colors. Remove bars before washing. (The bars and seat hangers of the two-